Hand files, Step-Back, Step-Down and Balanced Force Technique — complete clinical reference
Contents
The role and relevance of manual instrumentation in contemporary practice
Manual instrumentation remains irreplaceable in several clinical situations: initial negotiation of fine or calcified canals (pre-curved files #06–#15), canals with double curvature where NiTi rotary files carry a high fracture risk, manual glide path establishment before NiTi systems, retreatment of obturated canals, and resource-limited settings (no rotary equipment). It also provides the pedagogical foundation for understanding canal shaping. Mastery of manual techniques (Step-Back, Step-Down, Balanced Force) is a prerequisite for the rational use of rotary systems.
Role of manual instrumentation in modern endodontics
The rise of NiTi rotary and reciprocating systems since the 1990s transformed endodontic practice, significantly reducing shaping time and improving canal curvature preservation. Nevertheless, manual instrumentation retains irreplaceable indications and forms the pedagogical bedrock of endodontic training.
Persistent indications
Manual glide path (files #10–#15) before NiTi. Very fine canals (#06–#10) inaccessible to rotary instruments. Initial negotiation of calcified canals. Gutta-percha removal during retreatment (H-files). Severely curved or S-shaped canals with high NiTi fracture risk.
Advantages of manual
Direct, precise tactile feedback (proprioceptive feedback). Zero risk of instrument fracture from excessive torque (compared with rotary). Low cost. No dependence on an endodontic motor. Essential for the initial negotiation of all canals.
Limitations vs NiTi rotary
Longer preparation time. Higher risk of canal transportation on curves with classical techniques. Less reproducible result across operators. Circular cross-section, poorly adapted to oval canals without active irrigation.
ISO coding of manual endodontic instruments
ISO standard 3630-1 standardises the dimensions, colour coding, and tolerances of manual endodontic instruments. This standardisation allows comparability between brands and reliable clinical communication between practitioners.
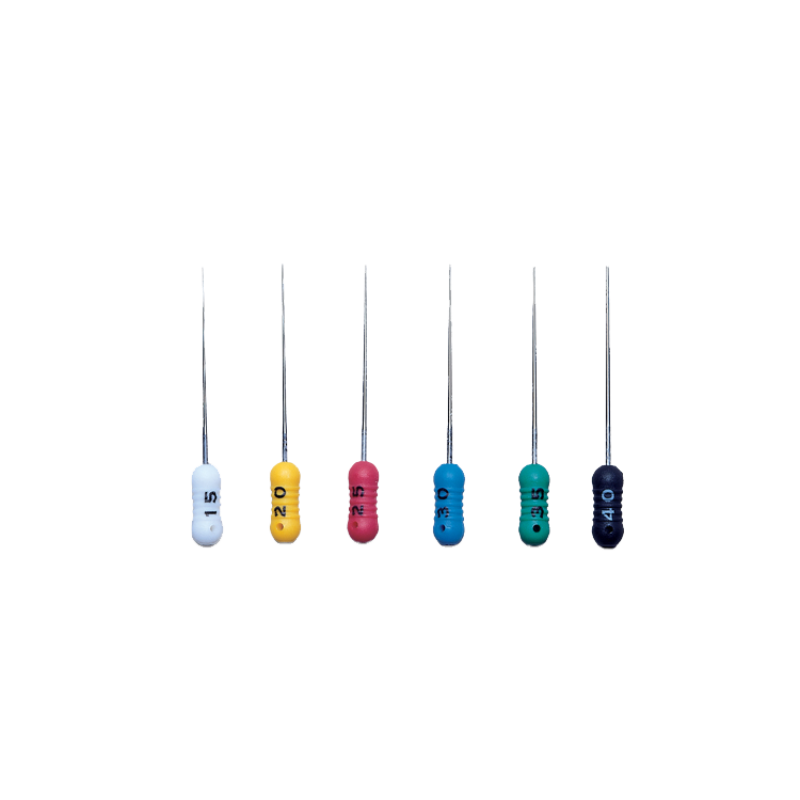
| ISO number | Colour | D0 diameter (tip) | D16 diameter (at 16 mm) | Clinical notes |
|---|---|---|---|---|
| 06 | Pink | 0.06 mm | 0.38 mm | Very fine, calcified canals — K-files in flexible stainless steel only |
| 08 | Grey | 0.08 mm | 0.40 mm | First negotiation file for difficult canals |
| 10 | White | 0.10 mm | 0.42 mm | Standard glide path — first file to reach working length |
| 15 | Yellow | 0.15 mm | 0.47 mm | Second glide path file — confirms patency |
| 20 | Red | 0.20 mm | 0.52 mm | Minimum MAF for very fine canals |
| 25 | Blue | 0.25 mm | 0.57 mm | Common MAF for medium-calibre canals (incisors, premolars) |
| 30 | Green | 0.30 mm | 0.62 mm | Common MAF for wide canals |
| 35 | Black | 0.35 mm | 0.67 mm | MAF for palatal canals of upper first molars, distal canals of lower first molars |
| 40 | White | 0.40 mm | 0.72 mm | MAF for very wide canals |
| 45 | Yellow | 0.45 mm | 0.77 mm | Palatal canal preparation in young patients |
| 50–80 | Red–grey (cycle repeats) | 0.50–0.80 mm | — | Very wide canals — less frequent, advanced step-back |
ISO taper rule: All ISO manual instruments have a taper of +0.02 mm per mm (2 % taper) — the diameter increases by 0.02 mm for each millimetre from tip to shank. Example: ISO 25 file (D0 = 0.25 mm) → at D16 = 0.25 + (16 × 0.02) = 0.57 mm.
Available lengths: 21 mm (short teeth, children), 25 mm (adult standard — most commonly used), 28 mm (long-rooted teeth), 31 mm (molars with long roots). Graduated markings on the file shank help control depth during use.
The colour sequence repeats every 5 sizes in cycles: White (10, 40) — Yellow (15, 45) — Red (20, 50) — Blue (25, 60) — Green (30, 70) — Black (35, 80). In practice: remembering White-Yellow-Red-Blue-Green-Black for the first six sizes (10 to 35) covers 95 % of clinical use.
K-files — morphology and use
K-files (from Kerr, who developed them) are the most widely used manual endodontic instruments. They are manufactured by twisting a square or rhomboid-section wire blank into regular helical flutes.
Standard K-file (stainless steel)
Manufacture: Twisting of a square-section wire (~25–40°/mm). Number of flutes: 12–16 per 16 mm depending on size. Taper: ISO 0.02. Motions: Quarter-turn + pull (filing) or plunge-and-pull (reaming). Effective in both rotation and filing. Indispensable for negotiation and glide path establishment.
K-Flex file (Kerr)
Rhomboid cross-section → more flexible than a standard K-file of the same size. More aggressive cutting edges. Better penetration in curved canals. Same motions as the standard K-file. Indicated for sinuous canals where the standard K-file meets excessive resistance.
Flex-R file (Union Broach)
Specifically designed for the Balanced Force Technique (Roane 1985). Non-cutting safety tip — prevents apical transportation. Triangular cross-section for greater flexibility. Effective for curved canals. Do not use in classical reaming — Balanced Force motion only.
C+ files / C-pilot files
Ultra-fine K-files (#06, #08, #10) in reinforced stainless steel or NiTi. Used exclusively for the initial negotiation of calcified or very fine canals. Single use recommended for #06 and #08. Handle with extreme care — never force.
K-file motions: Two main motions: filing — gentle apical penetration, quarter-turn clockwise, then pull — is the safest motion. Reaming — continuous quarter-turn rotation without apical pressure — is effective but increases fracture and transportation risk on small sizes. In routine practice: favour filing (penetration + pull) for all curved canals; reaming is acceptable only on straight, wide canals.
Hedström files (H-files) — morphology and indications
Standard H-file (Hedström file)
Manufacture: Helical machining of a cylindrical wire blank (inverted Christmas-tree profile in cross-section). Key feature: Cutting edges effective only on withdrawal (pull stroke). Maximum cutting efficiency on retraction — highly aggressive on canal walls. NEVER rotate in a curved canal → near-certain fracture.
H-file — permitted motions
Longitudinal pull only: insert into the canal without rotation, then pull occlusally with light lateral pressure. Never rotate in a curved canal. Quarter-turn rotation acceptable only in straight, wide canals. Used in retreatment for gutta-percha removal (very effective on pull stroke).
Clinical indications for H-files
Gutta-percha removal in retreatment (H#30–#40 introduced into GP softened by heat or solvent — pull stroke removes it in a spiral). Shaping of straight wide canals (palatal canals, distal canals of lower first molars — round and straight only). Final widening of an already-shaped canal. Particularly useful for retreatment.
The Hedström file must NEVER be rotated in a curved canal. Its helical cutting edges create massive wall engagement during the pull stroke — if the instrument is locked by a curve and forced into rotation, it fractures almost instantaneously. In a curved canal: gentle insertion only + longitudinal pull. If resistance is encountered on insertion: do not force — use a pre-curved K-file first to establish the path.
Other hand instruments
Barbed broach (nerve broach)
Stainless steel shank with lateral barbs. Single use. Extraction of pulp tissue from the canal (pulpectomy). Insert gently until resistance, quarter-turn, withdraw. Contraindication: curved canals (frequent fracture), very fine canals (binding). Role limited to initial pulpectomy in straight, wide canals.
Gates Glidden drills (GG)
Long-shank burs run on a slow-speed handpiece (contra-angle). Sizes #1 to #6 (increasing diameter). Coronal pre-flaring and coronal-third widening before apical instrumentation. Non-cutting safety tip. Risk of strip perforation if used too deeply on curved roots — do not advance beyond the coronal third.
Peeso drills (P-files)
Similar to GG but with a cylindrical cutting surface along the full length. Coronal widening before post-space preparation. More aggressive than GG — high perforation risk. Indicated only for post-endodontic canal preparation prior to post placement.
Manual NiTi files
NiTi files (#15–#35) used by hand (without a motor). Far more flexible than stainless-steel K-files. Indicated for curved canals where stainless-steel K-files resist. Same motions as K-files but with heightened caution: NiTi fractures without visible warning signs.
Principles of canal shaping
Canal shaping is the set of instrumentation procedures aimed at achieving the ideal prepared shape for three-dimensional cleaning and obturation. Four fundamental objectives (Schilder 1974) remain the reference:
Mechanical objectives
1. The prepared shape must taper continuously from apex to chamber. 2. The minimum diameter is at the apex (foramen preservation). 3. Preparation does not change the position of the apical foramen.
Biological objectives
4. The preparation stays within the root canal (no debris extrusion into periapical tissues). Preservation of the apical stop to limit all instruments to the working length.
Target result
Canal prepared in a "trumpet" or inverted-funnel shape: narrow at the apex (D0 corresponding to MAF), continuously flaring toward the occlusal, with preserved curvature, smooth walls, and no ledges.
Three essential concepts before any shaping procedure
Working length (WL): distance from a fixed coronal reference point (incisal edge, cusp tip) to the apical constriction (cemento-dentinal junction, ~0.5–1 mm short of the radiographic apex). Measured by electronic apex locator + confirmatory radiograph. Master apical file (MAF): the largest K-file reaching the WL with slight resistance on withdrawal. Defines the diameter of the apical preparation. Recapitulation: regular reintroduction of the MAF to the WL during the step-back to maintain patency and prevent apical debris accumulation.
Step-Back technique — apical sequence
The Step-Back technique (Clem 1969; Weine et al.) is the reference manual technique, still taught in the majority of dental schools as the foundational approach. It proceeds in two phases: apical preparation (widening the apical third to the MAF) and the coronal step-back (progressive flaring of the middle third by successively shortening the working length).
Progression between files must be strictly sequential (+5 ISO at a time: 10 → 15 → 20 → 25…). Skipping a size (e.g. 10 → 20 directly) creates a risk of binding, fracture, or transportation with the next instrument. In very fine or calcified canals: even more cautious progression (#06 → #08 → #10 → #15), or use EDTA alone for 2–3 minutes before each change to facilitate penetration.
Step-Back technique — coronal step-back and recapitulation
After apical preparation (MAF reached at WL), the step-back widens the middle and coronal thirds using progressively larger files at progressively shorter working lengths. The goal is the final tapered shape (trumpet form) while preserving the apical stop.
| Step | File used | Working length | Motion | Follow-up |
|---|---|---|---|---|
| Apical preparation | K#10 → K#15 → … → MAF (K#25) | WL = 21 mm (example) | ¼-turn + pull | NaOCl rinse + EDTA |
| Step-back 1 | K#30 (MAF+5) | WL–1 = 20 mm | ¼-turn + pull | Recap K#25 at 21 mm |
| Step-back 2 | K#35 (MAF+10) | WL–2 = 19 mm | ¼-turn + pull | Recap K#25 at 21 mm |
| Step-back 3 | K#40 (MAF+15) | WL–3 = 18 mm | ¼-turn + pull | Recap K#25 at 21 mm |
| Step-back 4 | K#45 (MAF+20) | WL–4 = 17 mm | ¼-turn + pull | Recap K#25 at 21 mm |
| Coronal flaring | Gates Glidden #2-3-4 | Coronal third only | Gentle rotation + withdrawal | Final NaOCl rinse |
Step-Down (Crown-Down) technique
The Step-Down technique (Marshall & Pappin 1980; Goerig et al. 1982) reverses the logic of Step-Back: instead of starting with small files at the apex and working coronally, it begins with large sizes in the coronal third and progresses toward the apex. This reduces apical debris extrusion and improves coronal access before apical instrumentation.
Advantages of Step-Down
Reduced extrusion of debris into periapical tissues (coffin-lid effect). Earlier improvement of irrigation (coronal canal open from the start). Straight-line access favoured. Better WL control (canal less loaded with debris during apical negotiation). Preferred in infected pulp necrosis cases.
Disadvantages of Step-Down
More complex to master during initial training. Risk of strip perforation (lateral wall thinning) if GG drills or large files advance too deeply in curved canals. Requires good pre-operative radiological assessment of anatomy before choosing working lengths for the first files.
Balanced Force Technique (BFT)
The Balanced Force Technique (BFT, Roane et al. 1985) is a manual filing technique using alternating rotational motions (clockwise then counter-clockwise) with apical pressure, enabling excellent preparation of curved canals with minimal transportation risk. It uses specifically Flex-R files (non-cutting safety tip).
BFT motion
1. Insert file into the canal. 2. Clockwise rotation ~90–180° with light apical pressure (engages cutting edges in dentine). 3. Counter-clockwise rotation ~120–240° while maintaining or increasing apical pressure (cutting and advancement). 4. Repeat until WL is reached.
BFT advantages
Excellent preservation of canal curvature. Minimal transportation even on severe curves. Efficient and rapid progression once mastered. Results comparable to NiTi rotary on curved canals in comparative studies.
BFT requirements
Specific training is essential — the technique is difficult to integrate intuitively. Must use Flex-R files exclusively (non-cutting tip). Do not use standard K-files in BFT (cutting tip → transportation). High manual dexterity required.
Working length determination
The working length (WL) is the distance measured from a fixed coronal reference point (incisal edge, cusp tip, access cavity margin) to the apical constriction (cemento-dentinal junction, located ~0.5–1 mm short of the radiographic apex). It is the apical limit of all instrumentation and obturation.
Electronic apex locator (EAL)
Current reference method. Measures electrical resistance or impedance between the intracanal electrode and the mucosal electrode. Reading: 0.0 = foramen; 0.5 = ideal position (0.5 mm from foramen). Accuracy: ±0.5 mm in 85–95 % of cases. Requires a moist canal (over-drying → false reading). Errors: excessive coronal fluid, unclean canals, perforations. Confirm with radiograph.
Radiographic method
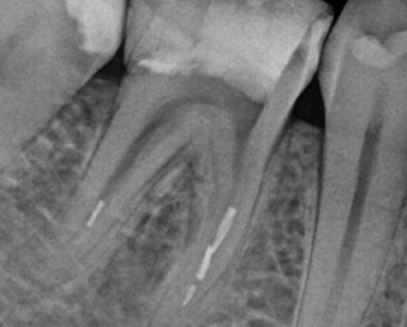
Periapical radiograph with a K#10–K#15 file in place. Measure the distance from file tip to radiographic apex. Subtract 0.5–1 mm. Parallel technique mandatory (projection distortion). Accuracy lower than EAL (±2 mm depending on angle). Essential as confirmation even when EAL is used. Primary method in the absence of an EAL (resource-limited settings).
Tactile method
Perception of slight resistance to advancement and slight resistance on withdrawal of the file at the WL (tactile feel). A useful complement but insufficient as the sole method — highly operator-dependent. Useful to confirm the file is at the constriction. Do not confuse with binding by a ledge.
On teeth with open apices (funnel or wide-open apex), the apical constriction is absent — there is no anatomical stop. The apex locator gives unstable or falsely short readings. Radiography is the reference method. WL is estimated 1–2 mm short of the visible radiographic apical border. Treatment of these teeth (apexification with MTA, revascularisation) does not involve aggressive apical instrumentation.
Irrigation and lubrication in manual instrumentation
Mechanical instrumentation alone cannot clean the uninstrumented areas of the canal system (isthmuses, deltas, lateral ramifications). Chemical irrigation is the most important cleaning step of endodontic treatment — it must be copious, frequent, and activated to be effective.
Sodium hypochlorite (NaOCl) 2.5–5.25 %
Reference irrigant. Triple action: mechanical cleansing, dissolution of organic tissue (pulp, biofilm), powerful antibacterial. Minimum volume: 2 ml per canal, renewed after each file. 27-gauge side-vent needle introduced without binding. DO NOT force injection under pressure — risk of apical extrusion.
EDTA 17 % (chelating agent)
Removes the smear layer (dentinal mud created by instrumentation). Do not alternate directly with NaOCl during instrumentation (chemical reaction inactivates both). Protocol: final EDTA 17 % rinse for 1 minute, then final NaOCl rinse. Use as lubrication between files (EDTA gel = RC Prep, Glyde, Endogel).
RC Prep / Glyde / Endogel (EDTA lubricant)
EDTA-based lubricant gel (±urea peroxide). Apply in the canal before each file. Reduces friction, lightly chelates dentine, facilitates progression in fine canals. Indispensable for negotiation of calcified canals. Available through most Algerian dental distributors (Extradent, MDI, Orodent).
Chlorhexidine 2 % (CHX)
Alternative to NaOCl in documented hypersensitivity. Powerful antibacterial but without tissue-dissolving capacity. Never mix directly with NaOCl (brown toxic precipitate). Intermediate saline rinse if alternating. Limited use in endodontics.
Forceful injection of NaOCl beyond the apical foramen into periapical tissues causes an immediate severe accident: intense pain, tissue swelling, tissue necrosis, risk of neurological complications near the inferior alveolar nerve. Absolute prevention: free needle (no binding — inject without resistance), very slow injection, controlled volume, needle length 2–3 mm short of WL. If an accident occurs: copious saline irrigation, immediate corticosteroids, analgesics, close monitoring.
Complications, pitfalls and Algerian context
Instrument fracture
Broken file in the canal. Causes: undetected visible deformation, forced rotation in curved canal, NaOCl + stainless steel (corrosion), cyclic fatigue. Prevention: visual inspection before each use, single use for K-files #10–#15, never force. If fracture: attempt retrieval (ultrasonic + microtube), bypass, or leave in place if short and good prognosis.
Canal transportation / perforation
Deviation of the preparation from the original canal axis. Cause: insufficient step-back, overly rigid file on a curve, excessive apical force. Signs: pain during instrumentation, file "plunges" without resistance, excessive bleeding. Treatment: MTA if perforation confirmed.
Ledge formation
Dentinal shelf created by a rigid instrument on a curvature. The next file can no longer reach the WL. Prevention: pre-curve all files, never force. Treatment: pre-curved K#10 + EDTA, gentle watch-winding motions to bypass the ledge.
Apical plug
Accumulation of dentinal debris at the apex blocking progression. File can no longer reach the initial WL. Cause: insufficient rinsing, step-back without recapitulation. Treatment: recapitulation sequence + EDTA + NaOCl rinse + re-descent of pre-curved #10.
Over-instrumentation
WL exceeded → foramen perforation, debris extrusion. Cause: WL set too long, uncontrolled recapitulation, progression without rubber stop. Prevention: rubber stop at WL systematically, regular apex locator checks.
Missed canal / absent glide path
Introducing large files into a canal without prior glide path → binding, fracture, transportation. Absolute rule: always achieve a free K#10 at WL before introducing any file larger than K#15. Never start with K#20 without a free K#10 at WL.
Algerian context — available instruments and training
K-files and H-files (ISO standard) are available from virtually all Algerian dental distributors present at Dentex 2026: Extradent (Constantine), MDI (Oran), Dentina (Dély Ibrahim), El Fadhila Medical (Oum El Bouaghi), Dental Ouest (Oran), and through numerous regional distributors in Sétif, Batna, Annaba. Brands distributed include Dentsply Maillefer (VDW), COLTENE, and quality-comparable generics.
EDTA gel lubricant (RC Prep, Glyde or equivalents) and 2.5–5.25 % NaOCl are available as endodontic consumables. Electronic apex locators are also available (Root ZX II Morita, Elements Diagnostic, or equivalent models distributed locally). The Step-Back technique is the teaching standard in all seven Algerian dental schools and remains the foundational technique for endodontic practical sessions. The transition toward NiTi rotary systems is gradual — prior mastery of manual technique remains an essential pedagogical prerequisite.