
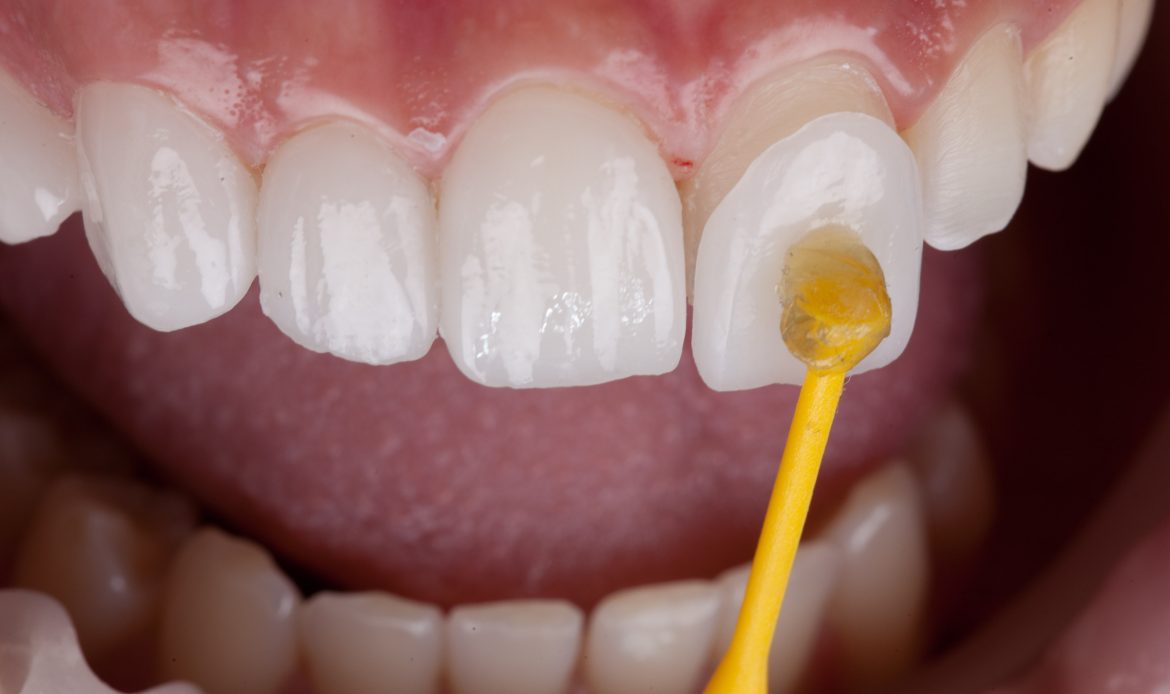
Ceramic Veneers
Materials, Indications, and Evidence-Based Clinical Tips (2020–2025)
Contents
What the best current evidence says — Klein et al. 2025
The most comprehensive meta-analysis on ceramic laminate veneers to date (Klein et al., Journal of Esthetic and Restorative Dentistry, 2025 — 29 studies, search to February 2024) reports pooled survival rates of 96.13 % for feldspathic, 93.70 % for leucite-reinforced glass-ceramic (LRGC) and 96.81 % for lithium disilicate (LDS) at approximately 10.4 years. No statistically significant difference was found between materials. The clinical takeaway: all three glass-ceramic types are reliable long-term options. LDS shows a trend toward lower complication rates at longer follow-up and may be preferred when mechanical demands are higher. Zirconia veneers are promising in the short term but lack long-term data. Preparation design and adhesive bonding technique matter more than material choice for the majority of cases.
Definition and clinical rationale
A ceramic veneer (also called a laminate veneer or porcelain laminate veneer — PLV) is a thin shell of dental ceramic bonded adhesively to the labial and sometimes palatal surface of a tooth to improve its colour, shape, or position. Thicknesses typically range from 0.3 to 0.7 mm for minimally invasive designs and up to 1.2 mm for conventional preparations. The success of ceramic veneers rests on three foundations: a reliable glass-ceramic–enamel resin-bond, a conservative preparation that preserves as much sound enamel as possible, and accurate shade communication with the dental laboratory.
Why ceramic rather than composite?
Ceramic veneers outperform direct composite in colour stability, surface hardness, plaque resistance and long-term esthetics. The ceramic surface does not absorb stain, resists abrasion by opposing teeth, and retains its polished finish over decades. Trade-off: ceramic is brittle, irreparable in the mouth, and the procedure is irreversible once enamel is removed. For young patients or low-demand cases, direct composite remains a reversible, cost-effective first step.
Why ceramic rather than a crown?
A veneer is minimally invasive by design: it replaces 3–30 % of the tooth structure removed by a full crown preparation. Preserving the maximum amount of healthy enamel is not only biologically sound — it is mechanically necessary, because the resin-bond between ceramic and enamel is far stronger and more durable than the bond to dentine. Crown preparation for a vital anterior tooth with sound structure is, by current standards, an over-treatment.
The enamel-bond principle
Ceramic veneers rely on micromechanical and chemical bonding to enamel through resin cement. Enamel provides the ideal substrate: abundant, predictably etchable, high bond-strength (~25–35 MPa with 4th/5th generation adhesives + HF-etched ceramic). When the preparation extends into dentine — or when the tooth is heavily restored — bond durability falls. This is why preserving enamel during preparation is not simply a "minimal-invasive" ideal: it is the biomechanical backbone of the restoration.
Clinical scope — which cases are veneers for?
Discolourations unresponsive to bleaching (fluorosis, tetracycline, non-vital). Diastema closure. Minor malocclusion correction (mild rotations, spacing). Shape modification (worn, short, or peg-shaped laterals). Chipped or fractured anterior teeth. Post-orthodontic finishing. Surface texture anomalies (amelogenesis imperfecta). Veneers are not for structural replacement — that is a crown's domain.
Material overview — comparative table
| Material | Flexural strength | Translucency | Fabrication | Minimum thickness | Survival ~10 yr | Best indication |
|---|---|---|---|---|---|---|
| Feldspathic porcelain | 60–100 MPa | Very high — most lifelike | Hand-layered (lab) | 0.3–0.5 mm | 96.1 % | Maximally conservative veneer, colour artistry |
| Leucite-reinforced glass-ceramic (LRGC) IPS Empress, ProCAD | 120–160 MPa | High | Press or CAD/CAM | 0.6–0.8 mm | 93.7 % | Single anterior veneers, pressed laboratory workflow |
| Lithium disilicate (LDS) IPS e.max CAD/Press | 350–400 MPa | High (CAD) / Very high (press) | Press or CAD/CAM | 0.5–1.0 mm | 96.8 % | Anterior veneers + premolars, digital workflow, higher mechanical demands |
| Zirconia (ultra-translucent) Vita Suprinity, Celtra Duo | 600–1200 MPa | Moderate (improving rapidly) | CAD/CAM | 0.5–0.8 mm | Short-term data only | Bruxism, posterior veneers, high-strength cases |
| Resin nano-ceramic / hybrid Vita Enamic, Lava Ultimate | 150–200 MPa | Moderate | CAD/CAM | 0.5–0.8 mm | Limited long-term data | Chairside single-visit restorations, occlusal protection |
No material showed statistically significant superiority over any other in 10-year survival. The choice between feldspathic, LRGC, and LDS should be driven by: enamel substrate quality, mechanical demands (parafunctions), fabrication workflow (press vs. CAD/CAM), and laboratory capability — not by survival rates alone, which are comparable across all three.
Feldspathic ceramics — the esthetic benchmark
Feldspathic porcelain remains the gold standard for optical quality in ceramic veneers. Its unique glass matrix — almost entirely amorphous — transmits, refracts, and scatters light in a way that closely mimics the optical behaviour of natural enamel. No other material fully replicates this property. The trade-off is low mechanical strength: feldspathic ceramic fractures at stresses that lithium disilicate or zirconia would easily withstand.
Optical properties
Near-perfect mimicry of natural enamel translucency. The technician controls layering to replicate internal characterizations (halos, incisal translucency, milky-blue opalescence). Glaze firing creates a natural surface shine indistinguishable from enamel. Enamel-like DOR (Diagnostic Odds Ratio) scores: when independently calibrated observers try to spot feldspathic veneers among natural teeth in photographs, detection rates are near-chance level.
Mechanical limitations
Flexural strength 60–100 MPa — the lowest of all veneer materials. Brittle fracture mode (no plastic deformation before failure). Cannot be repaired in the mouth — a crack means remake. Not suitable for: posterior teeth under occlusal load, patients with bruxism, teeth with less than 50 % enamel remaining, or preparations extending into dentine. Feldspathic veneers demand precise occlusal design and strict patient selection.
Fabrication — laboratory hand-layering
Feldspathic veneers are fired by the dental technician, layer by layer, on a refractory die or platinum foil — CAD/CAM milling of feldspathic blocks exists (VITA VM7, TriLuxe) but optical properties are inferior to hand-layered work. This fabrication route requires a high-level ceramist. Turnaround: 5–10 working days. Communication: standardized photographs, shade tabs, mock-up scan data. Not suited for same-day chairside fabrication.
Etching and bonding — critical step
Feldspathic ceramic bonds exceptionally well when properly treated: hydrofluoric acid (HF) 5–9.5 % for 60–90 seconds → creates a retentive microstructure on the ceramic surface → silane coupling agent → resin cement. Bond strengths of 25–35 MPa have been reported. This HF-etching/silane sequence is mandatory and non-negotiable. Omitting silane reduces long-term bond durability by up to 50 % in thermocycling studies.
Leucite-reinforced glass-ceramics (LRGC)
Leucite-reinforced glass-ceramics (the IPS Empress family, ProCAD) were the first heat-pressed ceramic materials developed specifically for anterior restorations. Leucite crystals distributed in a glassy matrix act as crack arrestors, raising flexural strength to 120–160 MPa while preserving reasonable translucency. They remain a reliable, well-documented middle-ground option between the optical supremacy of feldspathic and the mechanical performance of lithium disilicate.
Press vs. CAD/CAM workflow
Heat-pressed (IPS Empress): wax pattern invested, ceramic injected under heat and pressure into a mould — results in a homogeneous, internally stress-free ingot. Stratification or staining can be applied over the monolithic body. CAD/CAM (ProCAD blocks): milled from pre-crystallized blocks. Faster, less technician time, but optical depth is slightly inferior to pressed work. Both routes etch and silane-couple identically to feldspathic.
Clinical position in 2025
LRGC has been largely superseded by lithium disilicate in most laboratory workflows — LDS offers higher strength, comparable translucency, and a faster milling time. LRGC retains a role where laboratories have invested heavily in pressed workflows, or where the case requires the specific optical softness of a leucite-based glass. Long-term survival (93.7 % at 10.4 yr — Klein 2025) is excellent and supports continued use.
Lithium disilicate (LDS) — the current workhorse
Lithium disilicate glass-ceramic (IPS e.max, Vita Suprinity, Celtra Press/Duo) has become the dominant veneer material in contemporary prosthodontics. Its combination of high flexural strength (350–400 MPa), excellent translucency, and suitability for both pressed and CAD/CAM fabrication makes it the preferred choice for anterior veneers, posterior veneers, and thin full-contour single-unit restorations.
Mechanical advantage
Flexural strength 350–400 MPa — approximately 4× feldspathic. Crack-stop mechanism via lithium disilicate crystals interlocked in a glass matrix. Tolerates minor occlusal contact in posterior sectors. Suitable for minimally invasive preparations extending into dentine provided the adhesive zone is maximized. Better resistance to para-functional forces than feldspathic or LRGC.
Fabrication — two routes
IPS e.max Press: heat-pressed ingot → staining or cut-back and layering → higher optical quality, 7–10 day turnaround. IPS e.max CAD: milled in a partially crystallized blue state (easy machining) → crystallization firing in furnace → final hardness. Chairside CAD/CAM compatible (CEREC, Planmeca, Roland). Vita Suprinity / Celtra Duo: zirconia-reinforced lithium silicate — strength ~420 MPa, compatible with chairside milling.
Optical properties
Translucency close to feldspathic, inferior only in the rendering of very subtle internal effects (opalescence, halo). For the vast majority of clinical cases — discolouration masking, diastema closure, shape modification — LDS provides esthetics indistinguishable from feldspathic to the untrained eye. The pressed route with layering produces superior results to monolithic milled restorations in demanding esthetic cases.
Bonding considerations for LDS
LDS is etched with 5 % HF for 20 seconds (shorter than feldspathic — longer exposure does not improve bonding and risks surface damage). Silane coupling agent mandatory. Some protocols add an MDP-containing primer (Monobond Plus) to enhance chemical adhesion. LDS bonds reliably to both enamel and dentine — its higher strength makes it more forgiving of partial dentine preparation than feldspathic.
Zirconia and hybrid ceramics
Ultra-translucent zirconia veneers
3Y-TZP and 4Y-TZP (ultra-translucent zirconia) achieve flexural strengths of 600–1200 MPa while offering moderate translucency — a fundamentally different optical profile from glass-ceramics. Cannot be HF-etched (chemical resistance of zirconia prevents this) → surface treatment via air-abrasion (Al₂O₃ 50 µm, 1–2 bar) + MDP-containing primer (Monobond Plus / Z-Prime) + composite resin cement. Short-term survival data are promising (Klein 2025: "promising alternative") — long-term data (>10 yr) are absent. Currently indicated for patients with parafunctions or for posterior veneers where mechanical demand outweighs optical requirement.
Resin nano-ceramic / polymer-infiltrated ceramic (PICN)
Vita Enamic: double network — ceramic framework (86 %) infiltrated with polymer (14 %). Elastic modulus closer to dentine → lower chipping risk than pure ceramic. Milled chairside. Aesthetics intermediate between direct composite and glass-ceramic. Lava Ultimate (3M): resin nano-ceramic — initially approved for veneers, subsequently de-indicated for posterior implant-supported restorations (delamination risk) but remains suitable for non-implant anterior veneers. Both require surface treatment with adhesive systems rather than HF etching.
Zirconia cannot be micro-mechanically etched by hydrofluoric acid. Bonding relies entirely on: (1) tribochemical silica coating (CoJet/Rocatec) or Al₂O₃ sandblasting to create microroughness, and (2) chemical adhesion via an MDP-functional monomer primer. Skipping either step results in unreliable bond strength. Resin cements with MDP monomers (RelyX Unicem 2, Panavia V5, Maxcem Elite Chroma) are mandatory — conventional luting cements are contraindicated. The bond to zirconia remains the weakest link in the veneer system regardless of material strength.
Indications, contraindications and patient selection
| Category | Specific indication / condition | Notes |
|---|---|---|
| Colour | Tetracycline staining — moderate (grades I–II) | Requires ≥0.7 mm preparation for opaque resin to mask deeper stains |
| Fluorosis (mild to moderate) | Micro-abrasion may resolve mild cases — veneer for severe | |
| Non-vital discolouration after endodontic treatment | Walking bleach first (2 weeks min.) before veneer impression | |
| Refractory stains from restorations, metal corrosion | Remove failing restorations before preparation | |
| Shape / contour | Peg-shaped lateral incisors | Classic veneer indication — minimal prep or no-prep feasible |
| Worn anterior teeth (erosion, attrition) | Reorganize occlusion first; assess for parafunctions | |
| Chipped or fractured anteriors in enamel / shallow dentine | Direct composite if <1/3 of tooth involved | |
| Position / alignment | Diastema closure ≤2 mm | Papilla resorption risk if diastema >2 mm — orthodontics preferred |
| Mild rotation or spacing (non-correctable by ortho) | Wax-up essential — avoid over-tapering teeth | |
| Surface | Hypoplastic enamel (amelogenesis imperfecta) | Consult carefully — enamel often insufficient for reliable bond |
| Old composite veneers or direct restorations (renewal) | Remove composite first, assess residual enamel |
Absolute contraindications
Insufficient enamel (<50 % of the preparation in enamel) — bond failure. Severe malocclusion needing orthodontic correction first. Active periodontal disease or untreated caries. Edge-to-edge or deep anterior bite (veneer will fracture under direct occlusal contact). Non-compliant patient (failing to wear night guard after placement).
Bruxism — manage before committing
Bruxism is a relative contraindication for feldspathic and LRGC. If the patient must have veneers: switch to LDS or ultra-translucent zirconia; fabricate a hard acrylic occlusal splint; review at 3 months. Never place feldspathic veneers in a confirmed bruxer without occlusal protection.
Bleaching before veneer
Always perform tooth whitening 2–4 weeks BEFORE shade selection and preparation. Bleached enamel releases residual peroxide that inhibits resin polymerization for up to 3 weeks — bonding within this window risks bond failure. The whitened shade is also the target baseline from which the veneer shade is selected.
Periodontal health is non-negotiable
A veneer placed on a tooth with bleeding-on-probing or a 4 mm pocket will fail bioestetically within 2 years as the gingival margin recedes and exposes the restoration margin. Complete periodontal treatment + 3-month stability before any esthetic work.
Preparation design — from no-prep to conventional
No-prep veneer
Zero enamel removal — veneer bonded directly over the intact labial surface. Feasible only when: the tooth is retroclined (palatally positioned), significant contour/shade change is needed that the added volume addresses, and labial enamel is sound and accessible. Not suitable for already prominent or well-aligned teeth (creates over-contoured result). Minimum ceramic thickness: 0.3–0.5 mm feldspathic.
Minimally invasive / vertical prep
0.3–0.5 mm labial reduction without a cervical finish line (feather or knife edge). Preparation ends in enamel. No incisal overlap. No visible margin below the gingival sulcus. Most common design for anterior discolourations. Maximizes enamel bond surface. Requires the most precise ceramic craftsmanship for a natural gingival emergence profile.
Conventional preparation
0.5–0.8 mm labial, 1.5 mm incisal reduction (lingual overlap for incisal guidance), chamfer or rounded shoulder cervical margin placed 0.5 mm subgingival. Indicated for: worn teeth needing incisal restoration, teeth with existing restorations, or when the ceramist needs a defined cervical emergence. Higher risk of dentine exposure — match preparation depth to material choice.
Depth-cutting burs — the essential tool
Use a calibrated depth-cutting bur before any reduction (0.3 mm depth grooves for no-prep / 0.5 mm grooves for minimal prep / 0.7 mm grooves for conventional). This creates tactile reference stops that prevent inadvertent over-preparation. Over-preparation = dentine exposure = weaker bond = avoidable failure. After depth cuts, reduce between grooves and verify with a silicon depth index made from the diagnostic wax-up.
Diagnostic wax-up — mandatory first step
A wax-up on study models (or a digital design) is not optional. It defines the final volume, validates diastema closure proportions, creates the silicone index for prep depth verification and the template for provisional veneers. Presenting the mock-up to the patient on the diagnostic casts — or as a chairside composite mock-up — obtains genuine aesthetic consent before irreversible preparation.
Interproximal reduction
Remove interproximal contact for diastema closure or rotation correction. Use a tapered diamond bur or oscillating saw to open contacts. The preparation should pass through the contact point and finish in a defined margin accessible for the ceramist. Avoid leaving a "stair-step" at the contact that traps plaque. For pure labial discolourations without shape changes, interproximal preparation may be unnecessary.
Cervical margin design
Subgingival margins (0.5 mm into the sulcus) improve esthetic integration but increase biological risk (gingival inflammation, pocket formation). Supragingival or equigingival margins are biologically preferable and perfectly acceptable when the tooth's gingival anatomy is favourable. Consider subgingival margins only when the pre-existing restoration margin, discolouration, or gingival height asymmetry makes it unavoidable.
Adhesive bonding protocol — step by step
Etching feldspathic ceramic for only 20 seconds (the LDS timing) creates an under-etched surface with inadequate micro-porosity → weak resin tag formation → early bond failure. Conversely, etching LDS for 60–90 seconds (feldspathic timing) over-etches the surface, destroys the crystalline microstructure, and paradoxically weakens the bond. Feldspathic = 60–90 s · LRGC = 60 s · LDS (e.max) = 20 s. Label your HF timer for each material. This one timing error is responsible for a disproportionate share of early debonding failures.
Evidence-based outcomes — what the data say
| Study / Source | N veneers | Follow-up | Survival rate | Main findings |
|---|---|---|---|---|
| Klein et al. 2025 J Esthet Restor Dent | 29 studies (pooled) | 10.4 yr avg | Feldspathic 96.1 % · LRGC 93.7 % · LDS 96.8 % | No difference between materials. LDS trend to lower complication rate. Zirconia: short-term data only. 2025 |
| Alqutaibi et al. 2024 J Prosthet Dent | Systematic review & meta-analysis | Variable | High survival across substrates | Ceramic veneers bonded to enamel vs. dentine vs. composite substrate — enamel substrate consistently associated with best outcomes. 2024 |
| Beier et al. 2012 Int J Prosthodont | 318 veneers | Up to 20 yr | 94.4 % at 10 yr · 82.9 % at 20 yr | Landmark long-term study. Major failure mode: fracture (feldspathic). Patients with parafunctions had lower survival. Historical reference |
| Retrospective fieldspathic 2022 PMC | 170 veneers | 7 yr | 91.77 % | Vertical / no-prep technique. 14 fractures (replaced with LDS). 10 minor chips polished. FDI criteria evaluation. |
| Gresnigt et al. 2019 J Adhes Dent | RCT (indirect composite vs ceramic) | 3–5 yr | Ceramic superior to indirect composite | Ceramic veneers outperform indirect composite in colour stability and surface texture over time. |
What "survival" and "success" mean — and why the difference matters
Survival rate = the veneer is still in place (even if repaired, polished, or showing minor issues). Success rate (FDI criteria) = the veneer meets full clinical criteria — no chipping, staining, marginal discolouration, or biological complications. Success rates are always lower than survival rates. Beier et al. 2012 reported 82.9 % survival at 20 years — but success rates at that interval were considerably lower. When interpreting study results presented to patients, clarify which metric is being quoted.
Complications and failure management
| Complication | Frequency | Likely cause | Management |
|---|---|---|---|
| Fracture / chip | Most common technical failure (feldspathic: 41.5 % technical events — Klein 2025) | Parafunction, incisal loading, insufficient ceramic thickness | Small chip: composite addition + polish. Larger fracture: full remake. Prevention: night guard, occlusal clearance verification |
| Debonding | Second most common | Contaminated bond, insufficient enamel substrate, incorrect etching time | Rebonding if ceramic intact: treat intaglio as new (HF etch + silane). If intaglio contaminated: reclean in ultrasonic then re-etch + silane. Assess cause before repeating same protocol |
| Marginal staining / discolouration | Common at 5–10 yr | Composite cement at margin hydrolyses, plaque accumulation in microgap | Polish margin with fine finishing strips + rubber cup. If severe: rebonding or remake |
| Post-operative sensitivity | Transient (<2 weeks) in 10–30 % | Enamel preparation, bond contraction stress, dentine exposure | Desensitising toothpaste (potassium nitrate), fluoride varnish. Resolves spontaneously. If persistent >4 weeks: rule out pulpal inflammation |
| Gingival inflammation | 5–15 % at 5 yr | Subgingival margin, overcontouring, plaque accumulation | Improve oral hygiene instruction. Marginal scaling. If recurrent: consider margin relocation or remake with supragingival design |
| Colour mismatch | Esthetic failure — frequency varies | Inadequate shade communication, cement shade mismatch, bleaching not performed first | Remake. Prevention: standardised photographs, VITA shade guide, in-office mock-up approval, try-in paste before bonding |
Digital workflow and CAD/CAM veneers
The digital workflow has fundamentally changed ceramic veneer fabrication in the past decade. Intraoral scanning, digital wax-up (DSD — Digital Smile Design), milling or 3D printing of provisional veneers, and CAD/CAM milling of the final LDS restorations can all be integrated into a single chairside or lab-assisted pipeline that reduces turnaround time, improves marginal fit reproducibility, and allows the patient to preview and approve the esthetic outcome digitally before any preparation.
Digital Smile Design (DSD) — pre-treatment communication
Patient photographs (frontal smile at rest, at maximum smile, profile) are imported into DSD software (DSD App, Smile Designer Pro). Digital wax-up proportions are superimposed on the face. The patient reviews and approves a 2D/3D preview. Approved design is transferred to the laboratory for physical or digital wax-up. Dramatically reduces post-treatment dissatisfaction. Available on tablet or web-based platforms.
Chairside CAD/CAM (single-visit)
Intraoral scan → crown design on-screen → milling of LDS (e.max CAD) or PICN (Vita Enamic) block → crystallization firing (LDS) → staining/glazing → try-in → bonding. Total chair time: 2–3 h. Requires CEREC, PlanScan, or equivalent intraoral scanner + open milling system. Marginal fit comparable to lab-milled restorations in systematic reviews. Esthetic depth inferior to hand-layered pressed lab work — optimal for lateral incisors and premolars; demanding for maximally esthetic central incisors.
3D-printed provisional veneers
From the digital wax-up STL file, provisional veneers can be 3D-printed in composite resin (Formlabs dental resin, SprintRay ProModel). The patient wears the provisionals for 2–4 weeks — validating the proposed shape, length, and phonetics before the definitive ceramic is manufactured. This "live mock-up" phase is particularly valuable for multi-veneer cases (6–10 units) where patient expectation management is critical.
Laboratory CAD/CAM (open architecture)
The laboratory receives a digital scan + design prescription. Technician designs the veneer digitally, mills LDS or zirconia, adds staining and glaze. This workflow shortens conventional appointment time while maintaining artisan control over surface texture and optical layering. Most advanced dental labs in Algeria's CHUs and private sector are transitioning to this hybrid (digital design + manual finishing) workflow.
Algerian clinical context
Ceramic veneers are available in all major Algerian cities through private specialist practitioners and CHU prosthodontics departments. Local material availability and laboratory quality are the main determinants of which veneer systems a practitioner can reliably offer.
Available ceramic systems (Dentex 2026)
Ivoclar Vivadent (IPS e.max, IPS Empress): distributed by Orodent (Diamond Sponsor, Stand A01, Constantine). Most complete system for press and CAD/CAM veneer workflows. IPS e.max CAD compatible with CEREC and all open-architecture milling units. Ceramage Up (Shofu) + Vintage Art: distributed by Medical Biotop (Stand A13B). Indirect composite and feldspathic-type pressed ceramics — suitable for anterior veneers in laboratories with press workflow. Zircone: also distributed by Medical Biotop — ultra-translucent zirconia blocks for CAD/CAM.
Laboratory infrastructure
High-quality layering feldspathic veneers require a ceramist with advanced training — currently concentrated in private laboratories in Algiers, Oran, and Constantine. IPS e.max press and CAD/CAM veneers are more accessible as the technique is more forgiving of skill variation. CAD/CAM units (Roland, CEREC, SprintRay) are available in a growing number of Algerian CHU prosthetics departments and private practices. The Dentex 2026 conference (SAFEX, Alger) featured advanced ceramic and esthetic workshops, supporting ongoing upskilling of the Algerian dental community.
Shade communication — practical tips for local context
Standard VITA Classical and VITA 3D-Master shade tabs are available through Orodent and other distributors. Standardized shade photography (grey background, daylight 5500K, no flash) is essential when sending to a remote laboratory. For maximally demanding esthetic cases, a shade appointment separate from the preparation appointment — conducted at midday, natural light — improves laboratory communication. Custom shade mapping (technician photographs) are requested for complex tetracycline or fluorosis cases where the standard tabs are insufficient.
For most anterior veneer indications in Algerian practice: IPS e.max Press or CAD (via Orodent/Ivoclar) is the most accessible, well-documented, and mechanically reliable option. It tolerates the slightly greater technique variability of a developing laboratory infrastructure better than feldspathic. For the most demanding esthetic cases requiring the highest optical quality, coordinating with a specialist ceramist in a major city for hand-layered feldspathic remains the best route. Night guards should be systematically provided post-bonding — parafunction is a consistent predictor of veneer failure regardless of material.